
LinkedIn Enhances User Engagement with GIF Support in Comments and Streamlined Post Presentation
LinkedIn has rolled out a significant update, introducing native GIF support directly within its comment sections, a move designed to inject more dynamic and expressive communication into the professional networking platform. This feature, previously requiring users to convert animated GIFs into video formats for in-stream playback, now allows for seamless integration of moving imagery, potentially transforming how users interact with posts and engage in discussions. Alongside this visual enhancement, the platform has also revamped the presentation of post action buttons and engagement counts, aiming to create a cleaner and more intuitive user experience within the main feed.
The Rise of Visual Communication on Professional Networks
The integration of GIFs into LinkedIn’s comment functionality marks a notable shift for the platform, which has historically prioritized a more formal and text-centric communication style. While platforms like Twitter and Facebook have long embraced animated GIFs as a common form of expression, LinkedIn’s adoption signals a growing recognition of the power of visual communication in fostering engagement, even within a professional context. This move aligns with broader digital trends where short, attention-grabbing visual content plays an increasingly crucial role in online interaction.
Historically, sharing animated GIFs on LinkedIn’s main feed presented a technical hurdle. Users were compelled to convert their GIF files into MP4 video formats to ensure they would play automatically within the feed. This extra step often deterred casual users and limited the spontaneous use of GIFs as reactions or illustrative elements. The new update bypasses this cumbersome process, making it as simple as selecting a GIF from a library or uploading one directly into the comment field.
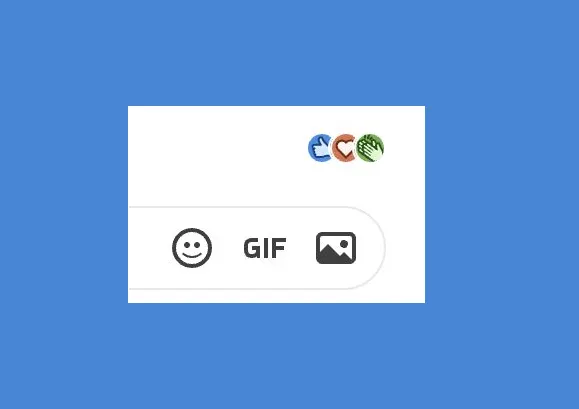
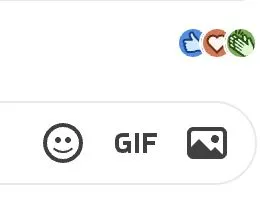
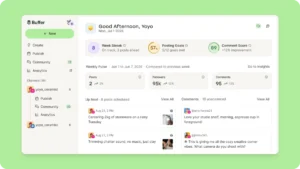
Hari Srinivasan, LinkedIn’s Chief Product Officer, shared the update via a LinkedIn post, accompanied by a visual demonstration of the new feature. The screenshot clearly illustrates the addition of a GIF option within the reply dialog box, positioned alongside other familiar tools for responding to posts. This direct integration suggests a deliberate effort to make the feature easily discoverable and accessible to the platform’s vast user base.
Acknowledging the "Uncool" Factor and Embracing Broader Appeal
The article acknowledges that GIFs might be perceived as "uncool" or outdated by some, particularly younger demographics. This observation highlights a nuanced understanding of internet culture and the evolving perception of digital communication tools. However, it also points out the potential for this feature to be embraced by a significant portion of LinkedIn’s user base. Reaction GIFs, for instance, can serve as a quick and effective way to express agreement, amusement, surprise, or other sentiments in response to industry news, company announcements, or personal updates shared on the platform.
LinkedIn has a history of supporting GIFs in other capacities. The platform has long permitted the use of GIFs within its direct messaging feature, allowing for more informal exchanges between users. Furthermore, marketers have been able to leverage GIFs in single-image ad formats, recognizing their potential to capture attention and convey information concisely. The extension of this functionality to comments democratizes its use, empowering all users to add a layer of visual flair to their interactions.
Streamlining the Feed: A Focus on Presentation and Actionability
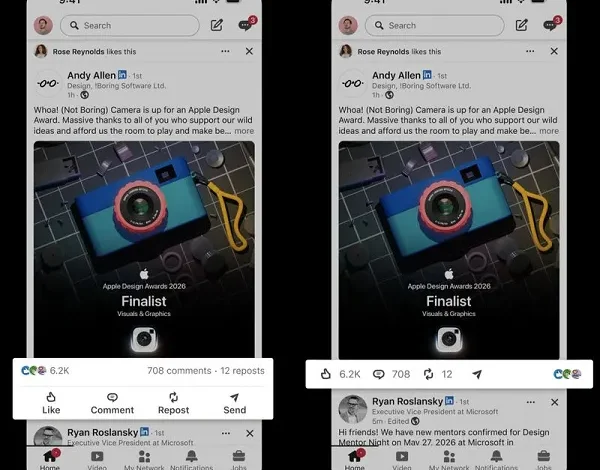
In parallel with the GIF update, LinkedIn has also addressed the presentation of its main feed. The platform has introduced a revised user interface for post action buttons and engagement counts. Previously, these elements might have been dispersed or presented in a manner that could clutter the visual landscape of the feed. The new design consolidates these interactive components into a single, streamlined line. This unification aims to declutter the feed, allowing users to more easily scan and engage with content.
The new UI presents action buttons such as "like," "comment," and "share," along with their corresponding counts, in a more cohesive arrangement. Users can now tap on these elements to initiate the respective actions, promoting a more intuitive and efficient interaction with each post. This redesign reflects a broader industry trend towards minimalist and user-centric design principles, prioritizing clarity and ease of use.
Potential Impact on User Engagement and Platform Dynamics
While both the GIF integration and the feed redesign might be considered incremental updates, their combined effect could be significant for LinkedIn’s overall user engagement.
Enhanced Expressiveness and Community Building
The introduction of GIFs in comments has the potential to foster a more vibrant and engaging community on LinkedIn. By allowing for a wider range of emotional and contextual responses, GIFs can break down some of the perceived formality of the platform. This could lead to more lighthearted interactions, encourage greater participation in discussions, and help users connect on a more personal level, even within a professional context. Imagine a developer sharing a complex code snippet and receiving a GIF of a lightbulb turning on as a sign of understanding, or a marketer celebrating a successful campaign with a GIF of confetti. These visual cues can add personality and warmth to professional dialogues.
A Competitive Edge in a Visually Driven Landscape
In the increasingly competitive landscape of social media, platforms are constantly seeking ways to differentiate themselves and capture user attention. The ability to easily share animated GIFs in comments positions LinkedIn more competitively against other professional networking sites and broader social media platforms. While the primary function of LinkedIn remains career development and professional networking, embracing more dynamic communication tools can help it retain users and attract new ones who are accustomed to more visually rich online environments.
Implications for Content Creators and Marketers
For content creators and marketers on LinkedIn, the new GIF feature offers additional avenues for engagement. They can now respond to comments with relevant GIFs, adding a personal touch to their interactions with their audience. Furthermore, the ability to more easily share dynamic content might inspire new forms of posts that leverage animated visuals. The streamlined post presentation also benefits marketers by ensuring that their calls to action and engagement metrics are presented clearly and effectively, potentially leading to higher click-through rates and more meaningful interactions with their campaigns.
Data-Driven Insights and Future Iterations
LinkedIn’s decision to roll out these features is likely informed by user data and behavioral analysis. The platform continuously monitors how users interact with its features, and the introduction of GIF support in comments, after its successful implementation in messaging, suggests a positive trend in user adoption and engagement with animated visuals. Similarly, the feed redesign is a response to observed patterns in user navigation and interaction with post elements.
The success of these updates will likely be measured by key engagement metrics such as comment volume, time spent on the platform, and the overall sentiment of user interactions. Future iterations may see further refinements to the GIF library, perhaps incorporating more professional-themed animations or allowing for greater customization. The platform may also explore other visual communication tools to further enhance user experience.
A Look Back: The Evolution of LinkedIn’s Communication Tools
The journey to this point has been gradual. LinkedIn’s initial focus was on professional profiles and networking. Over the years, it has steadily introduced features to foster more dynamic communication. The introduction of reactions beyond a simple "like," the ability to share articles and documents, and the expansion of video capabilities all paved the way for more expressive forms of interaction.
The GIF feature in comments can be seen as a natural progression, acknowledging the widespread use of this format across the internet. It represents a conscious effort by LinkedIn to balance its professional ethos with the evolving expectations of its user base for more engaging and visually rich online experiences. The platform’s commitment to user experience is further underscored by the ongoing efforts to refine the presentation of core functionalities, ensuring that even seemingly minor changes contribute to a more polished and intuitive user journey.
In conclusion, LinkedIn’s dual update—introducing GIF support in comments and streamlining post presentation—signals a strategic move to enhance user engagement and adapt to the evolving digital communication landscape. By embracing more dynamic visual elements and refining its user interface, LinkedIn aims to foster a more vibrant, interactive, and user-friendly professional networking environment. The long-term impact of these changes will undoubtedly be observed through user adoption rates, engagement metrics, and the overall evolution of communication on the platform.
