

How to highlight a menu item in WordPress? This guide dives deep into various methods, from simple CSS styling to intricate JavaScript effects and even plugin solutions. Learn how to make your website’s navigation stand out, enhancing user experience and guiding visitors effortlessly through your site.
We’ll cover everything from basic CSS techniques to more advanced JavaScript implementations, plus explore the options WordPress plugins provide. Understanding the best approach for your needs is key, and we’ll provide examples, tips, and comparisons to help you make the right choice.
Introduction to Menu Item Highlighting in WordPress
A well-designed WordPress website relies heavily on intuitive navigation. A key component of this user-friendliness is the clear and effective highlighting of important menu items. Highlighting guides users through the site, making it easier to locate specific content or sections. This helps improve the overall user experience and increases engagement with the site.Highlighting menu items isn’t just about aesthetics; it’s a crucial aspect of user-centered design.
By visually emphasizing active or important menu items, you can effectively guide users through your website and enhance their experience. Clear visual cues ensure that visitors know exactly where they are and how to navigate to the next stage.
Methods for Highlighting Menu Items
Visual cues are essential in guiding users through a website. Highlighting menu items can be achieved through various techniques. This often involves using visual cues that help users distinguish active menu items.
- Active State Styling: The most straightforward approach is to modify the visual presentation of the menu item when it’s currently selected or active. This could include changes in color, font weight, or background. For instance, a subtle change in the background color of the active menu item from a light gray to a darker gray can instantly draw the user’s attention to the current location.
The change could also include an underline to the active menu item.
- Hover Effects: Adding a hover effect, which changes the appearance of the menu item when the user’s cursor hovers over it, provides an additional layer of feedback. This gives users immediate visual confirmation that they can interact with the item. This is especially useful for menus that are long or complex. The hover effect could involve a subtle change in the background color of the item or an animation, such as a slight pulsation.
- Interactive Elements: Adding interactive elements can provide more engaging user feedback. This includes elements like dropdown menus, expanding sub-menus, or even animated transitions between menu items. These interactive features add a dynamic layer to the menu experience and can increase user engagement. Consider using transitions when users hover over a specific menu item to add visual interest.
Importance of Highlighting, How to highlight a menu item in wordpress
Effective menu highlighting is critical for a positive user experience. A well-structured menu with clear visual cues significantly improves site usability and user engagement.
- Enhanced Navigation: Highlighting guides users effortlessly through the site, ensuring that they can locate specific content or sections with ease. Clear navigation reduces the user’s cognitive load, enabling them to explore the site efficiently.
- Improved User Experience: Visual cues make the navigation process intuitive and seamless. This, in turn, leads to a more enjoyable user experience and encourages users to stay longer on the site. Clear menu highlighting minimizes user frustration and encourages them to stay longer on the website.
- Increased Engagement: Intuitive navigation, achieved through clear highlighting, can lead to higher user engagement. Users are more likely to explore different sections of a website if they can easily navigate to them. This can lead to higher interaction rates and more conversions.
Using CSS to Style Menu Items
Styling WordPress menu items with CSS allows for a customized visual experience, enhancing user interaction and site aesthetics. Properly applied CSS can transform a basic menu into a dynamic and engaging element, differentiating your website from others. This section dives into various CSS techniques for highlighting menu items, offering different approaches to hover effects, active states, and responsive design.Applying CSS to your menu items enables precise control over visual elements like color, font, and background.
By understanding and implementing these techniques, you can create a menu that intuitively guides users through your website and reinforces brand identity.
Hover Effects
Hover effects are a fundamental part of interactive web design. When a user’s mouse hovers over a menu item, a visual cue highlights the item, improving user experience and indicating the item’s interactive nature.
- Using the `:hover` pseudo-class is the standard approach. This allows for smooth transitions when the mouse moves over the item. For instance, changing the color or adding a subtle background will create the hover effect.
- Combining `:hover` with other properties, like `color`, `background-color`, and `text-decoration`, provides greater flexibility in customization. This lets you tailor the hover effect to match your website’s design.
- Employing `transition` properties creates a smooth visual effect as the mouse enters and leaves the item, improving user experience. This is often used in conjunction with other hover properties.
Active States
The “active” state highlights the currently selected menu item. This is crucial for providing clear visual feedback to the user.
Want to make a specific menu item pop on your WordPress site? A little CSS tweaking can do the trick! You can really elevate your site’s visual appeal, and learning how to highlight a menu item can boost engagement. This, in turn, can inspire your own social media strategies, like looking at some of the best social media campaigns out there.
Best social media campaigns can offer valuable insights for your website’s design. Ultimately, these design choices will improve your site’s overall user experience and, in turn, help you create a more effective menu that stands out.
- Use the `:active` pseudo-class to target the menu item when it is selected. This often involves different color schemes or background appearances to make it stand out.
- Consider using the `:focus` pseudo-class in conjunction with `:active`. This targets the item when it gains focus, often through keyboard navigation, providing an additional layer of visual feedback.
- For a subtle effect, adjust the text color or add a slight background opacity change. This ensures the highlighted element remains easily noticeable without being overly intrusive.
Color, Font, and Background Styles
- Adjust the `color` property to modify the text color of the menu items. Choose colors that complement your website’s design and improve readability.
- Modify the `font-family`, `font-size`, and `font-weight` properties to customize the font style, size, and boldness of the menu items. Maintain consistency with the overall website font style.
- Change the `background-color` property to alter the background color of the menu items. Select a background that enhances the menu’s visual appeal and distinguishes it from other elements.
Responsive Design
Responsive CSS ensures consistent highlighting across different screen sizes, from desktop monitors to mobile devices.
- Use media queries to target specific screen widths and adjust the styling for those widths. This ensures that the hover effects and active states are appropriately scaled for different devices.
- Adjust the `font-size` and `line-height` within media queries to maintain readability and visual appeal across various screen sizes.
- Consider the `max-width` property within your styles to ensure the highlighting remains appropriate even as the screen size changes.
CSS Selectors for Highlighting
| Selector | Description |
|---|---|
| `a:hover` | Highlights the link on mouse hover. |
| `a:active` | Highlights the link when clicked. |
| `a:focus` | Highlights the link when it gains focus (e.g., from keyboard navigation). |
| `li.active a` | Highlights a specific list item when active. |
| `#menu ul li a` | Targets links within a specific menu. |
CSS Code Examples
.menu-item:hover background-color: #f0f0f0; color: #000000;.menu-item.active background-color: #007bff; color: #ffffff;@media (max-width: 768px) .menu-item font-size: 14px;
These examples showcase basic hover and active styles. Adjust the colors, background colors, and font sizes to match your site’s design.
WordPress Plugins for Menu Item Highlighting

WordPress plugins offer a convenient alternative to manually crafting CSS for menu item highlighting. They often provide pre-built functionalities that streamline the process, reducing development time and effort. These plugins can also offer a wider range of customization options, potentially surpassing the limitations of pure CSS.Using plugins can significantly simplify the process of customizing menu item styles. They often come with user-friendly interfaces, allowing even less technically proficient users to achieve visually appealing and functional menu designs.
This approach is particularly beneficial for websites with complex navigation structures or multiple menu items requiring different highlighting styles.
Available Plugins for Menu Highlighting
Many WordPress plugins cater to menu customization, with some offering specific features for highlighting menu items. These plugins are valuable tools for those who want to improve the visual appeal and user experience of their website navigation. Finding the right plugin requires understanding the features offered and how they integrate with your website’s existing design.
Want to make a specific menu item pop on your WordPress site? It’s surprisingly easy! First, you’ll need to download WordPress for free, which you can do here: how to download WordPress for free. Once you have your site set up, you can use CSS to style the menu. Simple adjustments can make your navigation stand out, and enhance the user experience.
Comparing Plugin Features
The effectiveness of a plugin depends on its features and how they meet your specific needs. Different plugins offer varying degrees of customization for highlighting menu items. Some focus on simple highlighting, while others offer advanced styling options, potentially affecting other aspects of the site’s design.
Plugin Features and Capabilities Table
| Plugin Name | Highlighting Options | Other Menu Features | Ease of Use |
|---|---|---|---|
| Menu Builder by WPZOOM | Simple highlighting, color options, different states (hover, active). | Extensive menu customization, custom links, multiple menu locations. | High – intuitive interface |
| Mega Menu | Advanced highlighting, customizable hover effects, color schemes. | Mega menus, drop-down submenus, advanced positioning. | Medium – requires some understanding of menu structure |
| Navigation Menu Pro | Color highlighting, advanced styling options, multiple menu locations. | Extensive menu control, custom CSS integration, responsive design. | Medium – offers a lot of flexibility |
| WP Menu Manager | Basic highlighting, some color customization. | Limited menu customization options. | Low – basic interface, fewer options |
Plugin Pros and Cons
Plugins offer significant advantages in terms of ease of use and customization options. They often come with user-friendly interfaces, allowing quick implementation and modification of menu styles. However, relying solely on plugins may limit your control over the website’s overall design, potentially leading to conflicts with existing CSS styles or other plugins. Furthermore, plugins might not perfectly align with your desired design, requiring additional adjustments or custom code.
In contrast, custom CSS allows complete control over the website’s appearance but demands a higher level of technical expertise.
Theme Customization for Menu Highlighting
Theme customization offers the most direct and often the most effective way to highlight specific menu items. It allows you to tailor the visual presentation of your menu to match your website’s design and enhance user experience. Understanding your theme’s customization options is key to achieving the desired visual effect.This process leverages the theme’s built-in options, providing a streamlined approach.
Direct control over menu item styles ensures your highlighting aligns seamlessly with your website’s overall aesthetic, without the need for plugins that might add unwanted complexity or conflicts.
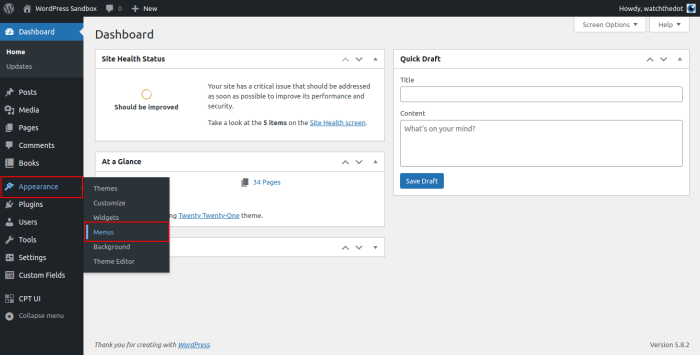
Accessing Theme Customization Options
WordPress themes typically include options for customizing menu appearance within their dashboard. The precise location varies depending on the theme. Often, you’ll find a dedicated “Appearance” or “Customize” section in the WordPress admin panel. Within this section, look for options related to menus, navigation, or header styles. These options often allow you to adjust colors, fonts, and other visual elements for menu items.
Modifying Theme Stylesheets
If direct customization options aren’t available or sufficient, you can modify the theme’s stylesheet. This requires a basic understanding of CSS (Cascading Style Sheets), the language used to style web pages. Theme stylesheets contain the CSS rules that dictate how elements on your website appear.To modify the stylesheet, you typically locate the CSS file within the theme’s folder.
This file often has a name like `style.css`. Use a code editor to open and edit this file.
Steps to Modify Theme Stylesheet for Highlighting
- Identify the relevant CSS selector for the menu item you want to highlight. For example, you might find selectors targeting specific list items (li) within the navigation menu. Careful examination of the existing stylesheet will reveal these selectors.
- Add or modify the CSS rules for the identified selector to apply the desired highlighting effect. This might involve adjusting the `color`, `background-color`, `font-weight`, or other CSS properties. Experimentation and testing are essential for achieving the perfect highlighting effect. Examples include adding a different background color to the highlighted item or using a different font style.
- Save the modified stylesheet file. WordPress will automatically reload the updated styles. Carefully review the changes to ensure the desired highlighting effect is correctly applied.
- Test the highlighting effect on various screen sizes and devices to ensure consistent appearance.
- Remember to back up your theme’s files before making any modifications.
Impact on Website Design Consistency
Customizing theme styles, whether through direct options or modifications to the stylesheet, directly affects the overall visual consistency of your website. Carefully crafted modifications ensure that the highlighted menu item seamlessly integrates with the existing design elements. In contrast, haphazard modifications can create inconsistencies and disrupt the aesthetic flow of your website. Maintain consistency in font choices, color palettes, and overall styling to maintain a professional and cohesive design.
Careful consideration is key to avoiding jarring contrasts or inconsistencies in the visual presentation.
JavaScript for Interactive Highlighting
Adding interactive elements to your WordPress menu, such as hover effects and click-based highlighting, elevates user experience. JavaScript provides the dynamic capabilities to achieve these visual cues, enhancing the menu’s responsiveness and visual appeal. By incorporating JavaScript, you can create a more engaging and user-friendly navigation system.
Implementing Hover Effects
To create hover effects, you’ll use JavaScript to modify the appearance of menu items when the user’s mouse hovers over them. This involves selecting the appropriate menu items using JavaScript and applying CSS styles dynamically. The JavaScript code will detect the hover event and trigger the desired visual change. This interactive behavior enhances user engagement, as it provides visual feedback when interacting with the menu.
Implementing Active States
Active states are essential for highlighting currently selected menu items. When a user clicks a menu item, JavaScript can be used to highlight that specific item. This is commonly achieved by adding a class to the selected menu item using JavaScript and then applying the corresponding CSS styles. This ensures that the active state visually indicates the user’s current location within the site’s navigation.
Click-Based Highlighting
Click-based highlighting allows for a distinct visual change when a user clicks a menu item. This is accomplished by applying a different color or style to the clicked menu item, providing clear feedback on the user’s interaction. The JavaScript code will handle the click event and apply the new style. This method provides a clear visual indicator to the user that their action has been registered.

Best Practices for Integrating JavaScript
Integrating JavaScript with WordPress themes and plugins requires careful consideration. To maintain compatibility and avoid conflicts, it’s recommended to use a separate JavaScript file for menu highlighting. This allows for easier management and modification of the script without affecting other aspects of the theme or plugin. Avoid directly modifying the theme’s JavaScript files to prevent unintended consequences and ensure the script’s long-term stability.
Always thoroughly test the JavaScript code after making any changes to ensure that it works correctly across different browsers and screen sizes.
JavaScript Code Example (Hover Effect)
This code selects all elements with the class “menu-item”. For each item, it adds a ‘highlight’ class on mouseover and removes it on mouseout. Remember to define the CSS styles for the ‘highlight’ class in your stylesheet.
Want to make a specific menu item pop on your WordPress site? A simple CSS tweak can do the trick! While you’re optimizing your site, exploring tools like BigQuery for PPC can unlock deeper insights and better results, helping you understand your audience and boost conversions. Then, remember to refresh your WordPress theme and enjoy that highlighted menu item!
JavaScript Code Example (Click Effect)
This code selects all menu items. When a menu item is clicked, it removes the ‘active’ class from all other items and adds it to the clicked item, ensuring only one item is highlighted at a time.
Accessibility Considerations for Highlighting: How To Highlight A Menu Item In WordPress
Making your website accessible to everyone, including users with disabilities, is paramount. Highlighting menu items, while often visually appealing, can unintentionally exclude users with visual impairments, cognitive differences, or motor limitations. Prioritizing accessibility ensures a positive user experience for everyone.Effective highlighting methods should be usable and comprehensible by all visitors. This involves considering various needs and implementing techniques that do not rely solely on visual cues.
Users with disabilities may utilize assistive technologies like screen readers, and these technologies must be able to interpret and convey the highlighted item to the user.
Ensuring Visual Contrast and Clarity
Proper color contrast is crucial for users with low vision. Ensure sufficient luminance differences between the highlighted item and its background. Using color alone for highlighting is insufficient. Alternative methods, like subtle visual changes or textual cues, should be considered as backup methods. Employing a color contrast checker tool is highly recommended.
Utilizing ARIA Attributes for Enhanced Accessibility
ARIA (Accessible Rich Internet Applications) attributes can significantly enhance accessibility. By adding appropriate ARIA attributes, you can effectively communicate the highlighted state of a menu item to assistive technologies. For example, the `aria-selected` attribute can inform screen readers that a particular menu item is currently selected. This approach enables screen reader users to understand the highlighted state without relying solely on visual cues.
Providing Alternative Textual Cues
In addition to visual cues, consider incorporating textual cues to inform users of the highlighted item. When a menu item is highlighted, consider using visual or auditory cues in conjunction with text descriptions to reinforce the highlighting. For instance, a short textual description or a subtle audio cue can complement the visual highlighting, making the interaction more accessible.
Guidelines for Visual Impairments
- Employ sufficient color contrast ratios between the highlighted item and its background. Consult accessibility guidelines (such as WCAG) for specific contrast requirements. This ensures the highlighting is discernible to users with low vision or color blindness.
- Incorporate non-visual cues like auditory signals (brief, distinct sounds) or haptic feedback (subtle vibrations) to indicate the highlighted item. These alternatives can provide feedback to users with visual impairments.
- Ensure the highlighted item’s style does not interfere with the readability of surrounding text or elements. Consider using subtle highlighting techniques that do not obstruct the content.
- Provide textual descriptions of the highlighted item. This is essential for users relying on screen readers to understand the context.
- Ensure that the highlighted state is clearly communicated to assistive technologies using appropriate ARIA attributes.
Advanced Highlighting Techniques
Taking menu highlighting beyond basic styles, advanced techniques can significantly enhance user experience. By incorporating animations and transitions, we can create visually engaging and dynamic menus that draw the user’s attention to the active item. These techniques also help users quickly understand the current context of their navigation.Adding visual flair to your menu items goes beyond simple color changes.
Integrating subtle animations and transitions creates a more sophisticated and interactive experience. The key is to balance visual appeal with user experience, ensuring the highlighting doesn’t distract or overwhelm the user. Custom icons and images can further personalize the highlighting, making the menu even more distinct and memorable.
Animating Menu Item Highlighting
Animations and transitions add a dynamic touch to highlighting. A smooth fade-in or a subtle bounce effect can significantly improve the user interface. Carefully chosen animations avoid distracting the user from the content. The duration and type of animation should be tested thoroughly to ensure a pleasant and intuitive user experience.
Transitions for Enhanced Visual Appeal
Implementing transitions for highlighting menu items can further improve the visual appeal. For instance, a smooth color transition from a light shade to a darker shade or a subtle change in opacity can add a professional touch. Testing different transition speeds and effects is crucial for achieving the best visual outcome.
Custom Icons for Menu Item Highlighting
Custom icons can enhance the visual representation of highlighted menu items. These icons can convey specific actions or information associated with the menu item. The choice of icon should complement the overall design and context of the website.
Integrating Custom Icons
To integrate custom icons into the highlighting mechanism, you need to link the icon to the specific menu item. You can achieve this using HTML’s image tag or by utilizing a suitable CSS framework. Consider the file paths and sizes to ensure the icon renders correctly on different devices and screen sizes.
Example: Custom Icon Highlighting
<nav>
  <ul>
    <li><a href="home.html" style="display: inline-block; position: relative;">Home</a>
      <img src="home-icon.svg" alt="Home" style="position: absolute; top: 50%; left: 100%; transform: translate(-50%, -50%); width: 20px; height: 20px; display: none;" id="home-icon">
    </li>
    <li><a href="about.html">About</a>
      <img src="about-icon.svg" alt="About" style="position: absolute; top: 50%; left: 100%; transform: translate(-50%, -50%); width: 20px; height: 20px; display: none;" id="about-icon">
    </li>
  </ul>
</nav>

<style>
  nav ul li a:hover
    background-color: #f0f0f0; /* Example hover effect
-/


  nav ul li a:hover #home-icon
    display: block;


  nav ul li a:hover #about-icon
    display: block;

</style>
This example demonstrates a simple approach.
The CSS `:hover` selector activates the icon display when the link is hovered over. Replace `home-icon.svg` and `about-icon.svg` with the actual paths to your custom icons. You can adapt this further to include more sophisticated animation and transition effects.
Closing Notes
From visually appealing hover effects to interactive click actions, this guide has equipped you with the knowledge to effectively highlight your WordPress menu items. Choosing the right method depends on your technical skills and design goals. Whether you opt for clean CSS, powerful plugins, or dynamic JavaScript, remember to prioritize accessibility for all users. Happy highlighting!