
How to add or remove blank space between WordPress blocks is a crucial skill for any website designer. WordPress blocks offer inherent spacing options, but often you need more control. This guide explores various methods, from simple block editor adjustments to custom CSS and theme modifications, helping you achieve the perfect layout for your WordPress site.
Understanding how to manipulate spacing is vital for creating visually appealing and user-friendly websites. This comprehensive tutorial provides step-by-step instructions, examples, and troubleshooting tips to master WordPress block spacing, no matter your technical proficiency.
Introduction to WordPress Block Spacing
WordPress blocks are the building blocks of modern website content. Unlike older page-builder methods, blocks are modular, reusable, and offer a flexible approach to website design. While WordPress inherently provides default spacing between blocks, often this isn’t enough to achieve the desired aesthetic. This flexibility allows for customization to perfectly match a site’s design and user experience.Users frequently need to adjust spacing to create visual hierarchy, improve readability, and ensure the site’s overall visual appeal aligns with the brand’s style guide.
For instance, separating headlines from body text, creating visually appealing layouts, and aligning elements precisely are all achievable with proper spacing manipulation.
Figuring out how to add or remove blank space between WordPress blocks can be a real pain, but luckily there are simple solutions. For example, using custom CSS is a great option. However, if you’re looking to boost your social media presence, check out this helpful infographic on 6 essential to dos for paid social success with infographic 6 essential to dos for paid social success with infographic.
Once you’ve got your social media game on point, you can return to tweaking those WordPress block gaps with ease!
WordPress Block Spacing Methods
WordPress offers several ways to manipulate spacing between blocks. These methods vary in complexity and control, catering to different levels of user expertise. A crucial understanding of these techniques empowers users to effectively craft engaging and visually appealing websites.
Block Spacing Options
WordPress blocks provide a variety of options to manage spacing. The most common approaches include adjusting margins, padding, and utilizing the block’s inherent spacing controls.
| Block Type | Default Spacing | Custom Spacing Method | Expected Result |
|---|---|---|---|
| Text Block | Default paragraph spacing, determined by theme settings. | Custom Padding (using the block’s settings) | Increased spacing around the text content. |
| Image Block | Default margin and spacing based on the theme. | Custom Margin (using the block’s settings) | Adjusted space between the image and surrounding content. |
| Button Block | Default spacing defined by theme or block style. | Custom Margin or Padding; adjusting the button’s dimensions. | Precise positioning of the button in relation to other blocks. |
| Gallery Block | Predefined spacing between images in the gallery. | Custom spacing between individual images (using block settings). | Control over the visual arrangement and distance between images within the gallery. |
Using WordPress Block Spacing Controls
Mastering the spacing between WordPress blocks is crucial for creating visually appealing and well-organized content. Proper spacing enhances readability and guides the viewer’s eye through your design. This section dives deep into the block editor’s built-in controls for adjusting spacing.The WordPress block editor provides intuitive tools for manipulating the space around your blocks. This direct approach allows for precise control over spacing, offering a significant advantage over manual CSS adjustments.
These tools are accessible within the block itself, streamlining the process.
Adjusting Spacing Directly in the Block Editor
The WordPress block editor offers built-in controls for adjusting the space surrounding individual blocks. These controls are often located in a panel or tab within the block’s settings. Different block types may have varying spacing options.
Spacing Controls for Different Block Types
The spacing options vary based on the block type. For example, a text block may have different controls than an image block.
- Text Blocks: Text blocks commonly allow adjusting top, bottom, left, and right margins and padding. This allows for customization of the space surrounding the text content.
- Image Blocks: Image blocks typically provide options to adjust spacing around the image, such as padding and margin. These settings are often organized in a dedicated panel or tab for easy access.
- Other Blocks: Blocks like headings, lists, and galleries also offer varying spacing controls. Inspecting the block’s settings panel within the WordPress editor reveals the specific options available for each.
Using Margin and Padding Settings
Margin and padding are crucial concepts for understanding how spacing works in WordPress blocks. Margin controls the space
- outside* the block’s content, while padding controls the space
- inside* the block’s content.
- Margin: Margin dictates the space between the block and its neighboring elements. Adjusting the margin values (top, right, bottom, left) creates the space around the block.
- Padding: Padding controls the space between the block’s content and its border. Modifying the padding values (top, right, bottom, left) adjusts the space within the block’s content area.
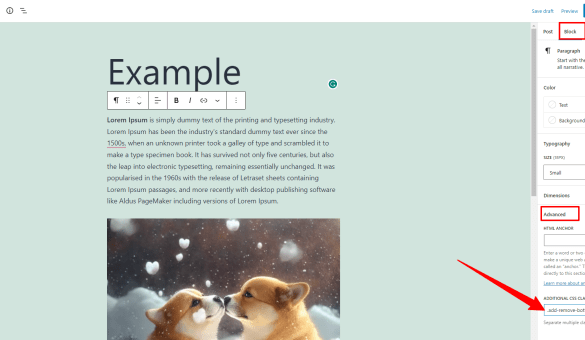
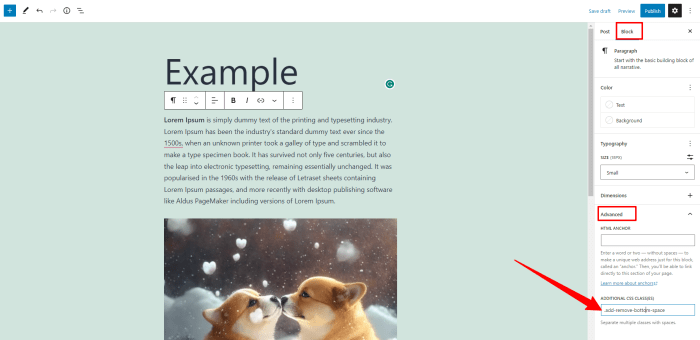
Step-by-Step Procedure for Manipulating Spacing in a Text Block
To demonstrate, let’s adjust the spacing of a text block.
- Select the text block you wish to modify.
- Locate the block’s settings panel (usually accessed by clicking on the block itself). The specific location may differ depending on the block type.
- Look for the spacing controls. These controls often appear as a section titled “Margin” and/or “Padding”.
- Input the desired values for top, right, bottom, and left margin or padding in the respective fields.
- Click “Update” or “Save” to apply the changes. The visual effect of the spacing adjustment should be immediately apparent.
Custom CSS for Spacing Adjustments
WordPress block spacing controls are great for quick adjustments, but sometimes you need more granular control. Custom CSS allows you to fine-tune spacing between blocks with precision, targeting specific elements and achieving layouts not possible with the built-in options. This approach is particularly useful for complex designs or when you need to create unique spacing patterns.
CSS Properties for Block Spacing
CSS provides powerful tools for controlling spacing around and between elements. Crucial properties for manipulating block spacing include `margin` and `padding`. `margin` affects the space
- outside* an element, while `padding` affects the space
- inside* an element. Understanding these differences is critical to achieving the desired spacing outcome.
Targeting Specific WordPress Blocks with CSS Selectors
WordPress blocks can be styled using CSS selectors. These selectors identify specific blocks or groups of blocks based on their attributes, allowing you to apply custom styles to them. Using classes or IDs on blocks provides the most targeted approach, enabling you to precisely style individual blocks without impacting other elements.
Examples of CSS Code for Different Block Types
To illustrate how to use CSS to control block spacing, here are examples for various scenarios.
- Adding space below a specific button block:
.my-button-block
  margin-bottom: 20px;
This CSS rule targets all elements with the class “my-button-block” and adds 20 pixels of bottom margin. You’d add this class to the button block using the block editor’s attributes panel.
- Creating space between two different types of blocks:
.text-block
  margin-bottom: 15px;

.image-block
  margin-top: 15px;
These rules add 15 pixels of bottom margin to text blocks and 15 pixels of top margin to image blocks. This ensures visual separation between the block types.
- Adjusting spacing around a heading block:
h2
  margin-top: 30px;
  margin-bottom: 20px;
This code adds 30 pixels of top margin and 20 pixels of bottom margin to all `
` heading elements. This is useful for creating visual hierarchy and separation.
Comparing CSS Approaches for Block Spacing
The table below summarizes various CSS approaches to block spacing, demonstrating their effectiveness and targeting scope.
| Method | Code Example | Result | Block Target |
|---|---|---|---|
| Using Classes | .my-class margin-bottom: 20px;
|
Space added below class | All elements with class my-class |
| Using IDs | #my-id padding-top: 10px;
|
Padding added above ID | Element with ID my-id |
| Using Selectors (e.g., Block Type) | .wp-block-paragraph margin-bottom: 30px; |
Spacing added below paragraph blocks | All WordPress paragraph blocks |
Theme Customization for Spacing
WordPress themes often dictate the visual presentation of your website, including the spacing between blocks. Understanding how themes influence block spacing is crucial for achieving a consistent and visually appealing design. Theme stylesheets, essentially CSS files, are the primary drivers for this presentation. Modifying these stylesheets allows for fine-grained control over block spacing, going beyond the inherent spacing options available within the block editor itself.
Theme stylesheets significantly impact block spacing by defining the default margins, padding, and other spacing properties for various HTML elements, including the containers that house WordPress blocks. This means the theme’s design philosophy and visual preferences will already influence the spacing of your content. By understanding how themes use CSS, you can effectively tailor your block spacing to align with your theme’s overall aesthetic.
Figuring out how to add or remove blank space between WordPress blocks can be a bit of a headache, but it’s totally doable. One thing to remember is that content marketing, like optimizing your website’s layout, often takes time to show results. For example, consider how long does content marketing take to work here. Ultimately, the best approach to adjusting those gaps is often trial and error, playing with different block settings and spacing options until you achieve the look you’re going for.
Theme Stylesheet Impact
Theme stylesheets use CSS rules to define how elements on your website appear. These rules, applied to HTML elements, control the spacing around blocks. Selectors in CSS target specific elements; when applied to block containers, these selectors control the spacing surrounding those blocks. Directly targeting the WordPress block container class is a common method for affecting block spacing within a theme.
Modifying Theme Styles
Customizing theme styles to alter block spacing requires careful modification of the theme’s CSS file. The theme’s stylesheet, typically located within the theme’s `style.css` file (or equivalent), is where these changes are made. Editing this file directly can be risky, especially if you plan to update the theme later. Consider creating a child theme to manage your modifications, ensuring they’re preserved during future theme updates.
A child theme creates a separate CSS file where you can add your customizations without affecting the original theme’s styles.
Adding Custom Spacing Settings
Adding custom spacing settings within a theme often involves targeting specific block types or elements. For example, you could target a specific block’s container class to adjust margins or padding. You might also use media queries to adjust spacing based on different screen sizes. This ensures responsiveness and adaptability to different devices.
Example Theme-Specific CSS
To illustrate this, consider this example snippet. This CSS code targets a specific block container and adds 20 pixels of top and bottom margin.
“`CSS
.wp-block-paragraph
margin-top: 20px;
margin-bottom: 20px;“`
This example, targeting the paragraph block, demonstrates how to apply custom spacing to a particular block type. You can adjust the values (20px in this case) to achieve the desired spacing. Remember to adapt the selector to match the specific block or container you wish to style. Always thoroughly test your modifications to ensure they produce the intended results.
Javascript for Dynamic Spacing: How To Add Or Remove Blank Space Between WordPress Blocks
Dynamic spacing in WordPress blocks using JavaScript allows for responsive and interactive adjustments. This approach offers greater flexibility and control over block layout, enabling modifications based on user actions, screen sizes, or other conditions. It’s particularly useful for creating adaptive designs that seamlessly adjust to different viewing contexts.
JavaScript empowers developers to implement dynamic spacing by responding to events or conditions. This means the spacing can change in real-time, rather than being fixed through static methods. This dynamic behavior enhances user experience by adapting the visual presentation to various scenarios.
JavaScript for Modifying Spacing Based on User Interactions
JavaScript can be used to modify spacing based on user interactions, such as button clicks or form submissions. This allows for interactive adjustments to the visual layout, offering a more engaging user experience. For instance, clicking a button could increase or decrease the spacing between blocks.
Examples of JavaScript Code for Dynamic Spacing
Modifying spacing dynamically using JavaScript involves manipulating the CSS properties of the elements. This approach is highly versatile and can be tailored to specific requirements. A simple example could be:
“`javascript
document.getElementById(‘myButton’).addEventListener(‘click’, function()
const block1 = document.getElementById(‘block1’);
const block2 = document.getElementById(‘block2’);
block1.style.marginBottom = ’20px’; //Adjust the spacing
block2.style.marginTop = ’20px’; //Adjust the spacing
);
“`
This code snippet listens for a click event on an element with the ID ‘myButton’. When clicked, it modifies the margin-bottom of a block with the ID ‘block1’ and the margin-top of a block with the ID ‘block2’.
Using JavaScript Libraries for Manipulating Spacing
JavaScript libraries, such as jQuery, simplify the process of manipulating elements and their CSS properties. These libraries offer streamlined methods for selecting elements, modifying their styles, and handling events. This results in cleaner and more maintainable code.
“`javascript
$(document).ready(function()
$(‘#myButton’).click(function()
$(‘#block1’).css(‘margin-bottom’, ’30px’);
$(‘#block2’).css(‘margin-top’, ’30px’);
);
);
“`
This jQuery example achieves the same result as the previous example but uses a more concise syntax.
Dynamic Spacing Adjustment Based on Screen Size
Adapting spacing based on screen size is crucial for creating responsive designs. JavaScript can detect the current screen size and adjust the spacing accordingly.
“`javascript
function adjustSpacing()
const screenWidth = window.innerWidth;
if (screenWidth < 768)
document.getElementById('block1').style.marginBottom = '10px';
else
document.getElementById('block1').style.marginBottom = '20px';
window.addEventListener('resize', adjustSpacing);
adjustSpacing(); //Initial call
“`
This code snippet adjusts the margin-bottom of the block with the ID 'block1' based on the width of the screen. The initial call to `adjustSpacing()` ensures the spacing is correctly set on page load.
Scenarios Requiring Dynamic Spacing Adjustments
Dynamic spacing adjustments are vital in several scenarios. Responsive designs, where the layout needs to adapt to different screen sizes, benefit greatly from dynamic spacing. User interactions, such as toggling options or filtering results, also necessitate dynamic adjustments to maintain visual consistency.
Troubleshooting Spacing Issues
WordPress block spacing, while generally straightforward, can sometimes present unexpected challenges. Understanding common problems and their solutions is crucial for maintaining a clean and consistent layout. This section will delve into troubleshooting techniques, providing a systematic approach to identifying and resolving spacing issues within your WordPress site.
Incorrect spacing often stems from misconfigurations in the block editor, conflicting CSS rules, or theme-specific limitations. This guide will equip you with the tools and knowledge to pinpoint the root cause and implement effective fixes.
Common Spacing Problems
Incorrect block spacing can manifest in various ways, including uneven gaps between blocks, blocks overlapping, or blocks not aligning properly with the intended design. These issues can arise from several sources, and identifying the cause is often the first step toward a solution.
- Misconfigured Block Settings: Sometimes, the spacing controls within the WordPress block editor itself are misaligned. This might be due to unintended changes, incorrect settings selection, or hidden options that are affecting the block’s rendering. Double-checking block-specific spacing settings and adjusting them as needed can rectify this.
- Conflicting CSS Rules: Custom CSS, either applied directly to your website or within a theme, might conflict with the WordPress block editor’s spacing settings. This often leads to unpredictable spacing outcomes. Inspecting and potentially modifying or removing conflicting CSS rules can resolve these discrepancies.
- Theme-Specific Limitations: WordPress themes, while offering flexibility, can occasionally impose limitations on block spacing. Some themes might have default styles that unintentionally interfere with block spacing. Understanding your theme’s documentation and adjusting the theme’s settings or using theme customization tools can address these limitations.
- Plugin Interactions: WordPress plugins can also influence the layout and spacing of blocks. Incompatible plugins or conflicts between plugins can result in unexpected spacing behaviors. Deactivating plugins one by one and checking the spacing can isolate the problematic plugin.
Identifying the Cause of Incorrect Spacing
A systematic approach to identifying the cause of incorrect spacing is crucial. It involves examining various factors and comparing observed spacing to expected results.
- Visual Inspection: Begin by carefully examining the spacing issues in different parts of your website. Look for patterns in the problematic spacing to identify potential triggers.
- Inspecting Block Settings: Check the individual settings for each block that is exhibiting the spacing problem. Pay close attention to the spacing and alignment controls within the WordPress block editor.
- Inspecting the CSS: Use your browser’s developer tools (typically by right-clicking and selecting “Inspect”) to examine the CSS rules applied to the problematic block. This involves looking for any rules that might be influencing the spacing. Check for both inline styles and styles referenced from external stylesheets. Identifying and correcting any discrepancies in the CSS will often resolve the problem.

Ever wrestled with unwanted gaps between WordPress blocks? It’s surprisingly easy to adjust spacing. Understanding the nuances of block spacing is crucial, but sometimes you need a deeper dive into marketing strategies. For example, learning about the top 6 B2B marketing benefits of doing a brand study research roundup here can really boost your brand.
Once you’ve got that in mind, returning to the simple task of tweaking block spacing becomes a breeze. Just remember, a little adjustment goes a long way.
- Examining HTML Structure: Inspect the HTML structure of the block to see if there are any inconsistencies in the tags or attributes that could be contributing to the spacing. Misaligned or missing elements within the HTML can cause issues in spacing.
Methods to Inspect CSS and HTML Structure
Using browser developer tools is essential for investigating spacing issues. These tools provide insights into the underlying CSS and HTML structures, enabling precise identification of the problematic code segments.
- Using Browser Developer Tools: Inspect the CSS and HTML code of the problematic block. This allows you to see the rules and structure that are influencing the spacing.
- Inspecting Inline Styles: Look for inline styles applied directly to the block, which might override other spacing settings. This can help you identify conflicts.
- Identifying Conflicting CSS Rules: Use the browser developer tools to compare the styles applied to the problematic block with the expected styles. This helps in identifying conflicting rules that might be causing unexpected spacing.
Systematic Approach to Finding and Resolving Spacing Problems
A structured approach is essential for effectively resolving spacing issues. It involves methodical testing and evaluation to pinpoint the root cause and apply targeted solutions.
- Isolate the Problem: Identify the specific block or area where the spacing issue occurs. This involves narrowing down the problematic sections of the page.
- Check Block Settings: Review the individual block settings for spacing and alignment options. Ensure these settings are consistent with your design goals.
- Inspect CSS Rules: Use browser developer tools to inspect the CSS rules applied to the block. Look for potential conflicts and ensure the rules are not overriding intended spacing.
- Test and Iterate: Implement temporary fixes and test the changes to see if the spacing issues are resolved. Repeat steps if necessary until the spacing is corrected.
Responsive Spacing Design
WordPress block spacing should adapt seamlessly to different screen sizes, ensuring a consistent user experience on desktops, tablets, and mobile devices. A responsive design approach is crucial for maintaining visual appeal and usability across various platforms. This method ensures content remains readable and aesthetically pleasing regardless of the device used.
Ensuring Consistent Spacing Across Screen Sizes
Responsive design for block spacing hinges on adjusting the spacing elements based on the screen’s width and resolution. This involves using techniques that automatically alter the spacing values as the viewport changes, resulting in a consistent visual experience. Using media queries is the standard method for achieving this adaptability.
Media Queries for Responsive Spacing Adjustments
Media queries are CSS rules that apply specific styles based on the characteristics of the viewing device or browser. For responsive block spacing, media queries define how the spacing elements should adjust as the screen size changes. These queries allow you to tailor spacing for mobile, tablet, and desktop viewports, maintaining consistency.
CSS Media Queries for Adjusting Spacing, How to add or remove blank space between wordpress blocks
Media queries allow for granular control over spacing. They target specific screen widths or orientations, enabling the adjustment of margins and padding accordingly. This ensures the desired visual outcome adapts to different device resolutions.
“`CSS
/* Example media queries for adjusting spacing
-/
@media (max-width: 768px)
.my-block
margin: 10px;
padding: 5px;
@media (min-width: 769px) and (max-width: 1024px)
.my-block
margin: 20px;
padding: 10px;
@media (min-width: 1025px)
.my-block
margin: 30px;
padding: 15px;
“`
These examples target different screen sizes (mobile, tablet, and desktop) and modify the margin and padding of a block with the class “my-block”. Adjust the breakpoints and values to match your specific design needs. These queries adjust the visual presentation based on screen resolution.
Responsive Spacing Adjustments Table
This table demonstrates how responsive spacing can be implemented to create consistent spacing across various screen sizes.
| Screen Size | Margin | Padding | Result |
|---|---|---|---|
| Mobile | 10px | 5px | Tight spacing, ideal for small screens |
| Tablet | 20px | 10px | Medium spacing, suitable for intermediate-sized screens |
| Desktop | 30px | 15px | Wider spacing, optimal for larger screens |
This table summarizes the responsive spacing adjustments, showcasing how the margin and padding values change based on the screen size, ensuring a consistent visual presentation.
Best Practices for Spacing
Effective spacing in WordPress layouts is crucial for creating visually appealing and user-friendly websites. Properly implemented spacing guides the user’s eye, emphasizing important content and ensuring a clean, organized browsing experience. Consistent spacing throughout a website fosters a cohesive visual identity and enhances the overall user experience.
Well-structured spacing establishes visual hierarchy, directing the reader’s focus to key elements like headings, calls-to-action, and images. This hierarchy contributes significantly to a site’s readability and overall aesthetic appeal.
Visual Hierarchy and Spacing
Visual hierarchy is paramount in guiding the user’s eye through a website. Appropriate spacing between elements, such as headings and paragraphs, helps delineate different sections and levels of importance. Larger spacing around headings, for instance, signals their significance and creates a clear visual separation from the surrounding text. Conversely, smaller spacing between related paragraphs can reinforce their connection.
This deliberate manipulation of space creates a logical flow and improves comprehension.
Creating Visually Appealing Layouts
A visually appealing layout considers the use of negative space, or the space between elements. Negative space isn’t empty; it’s crucial for creating visual breathing room and preventing layouts from feeling cluttered. Strategic use of negative space improves the overall aesthetic appeal and user experience by reducing visual noise. It enhances readability and allows the viewer to focus on the most important elements.
Employing varying spacing for different elements further strengthens the visual hierarchy.
Consistent Spacing Across the Website
Implementing consistent spacing throughout a website creates a cohesive visual identity. This consistency establishes a recognizable pattern, making the website feel more polished and professional. A style guide, which dictates spacing parameters, is essential for ensuring consistency. This style guide should be followed meticulously by all designers and developers working on the site. A consistent spacing approach can contribute significantly to the site’s visual appeal and overall user experience.
Spacing Guidelines
This set of guidelines provides a structured approach to spacing in WordPress layouts:
- Use varying spacing to create visual hierarchy. Headings should have ample space above and below them to set them apart. Paragraphs should have smaller spacing between them to maintain a cohesive flow.
- Employ negative space strategically. This empty space between elements prevents layouts from feeling crowded. Use it to draw attention to key elements or create visual separation.
- Maintain consistent spacing throughout the website. A style guide that defines spacing rules for different elements (headings, paragraphs, images, etc.) is highly recommended. This ensures a uniform visual aesthetic.
- Consider the use of gutters, which are the spaces between columns or blocks. Consistent gutter spacing contributes to a well-organized layout.
- Test spacing on different devices and screen sizes. A layout that looks good on a desktop might appear cluttered or difficult to read on a mobile device. Ensure that the spacing adapts to various screen sizes and orientations.
Examples of Good Spacing Practices
Numerous examples demonstrate effective spacing techniques in WordPress layouts. These include websites with clean, well-organized structures where spacing enhances readability and aesthetic appeal. Look for websites that employ varying spacing to emphasize key content and create a visual hierarchy. Note how they use negative space to avoid clutter and maintain visual interest. Observing successful examples provides valuable insights and inspiration for creating your own layouts.
Epilogue
In conclusion, controlling spacing in WordPress blocks is a multifaceted process. Whether you prefer direct block editor adjustments, the precision of custom CSS, or the broader influence of theme customization, this guide equips you with the knowledge to create a harmonious and visually engaging WordPress website. Remember to consider responsive design principles for a consistent experience across all devices.
By mastering these techniques, you’ll elevate your WordPress website design to new heights.