How to add expires headers to your WordPress website is crucial for boosting site speed and performance. HTTP Expires headers are a fundamental part of web caching, allowing browsers to store static assets like images and CSS files locally, reducing server load and improving page load times. Understanding how to implement them correctly, whether through plugins or manual configuration, can significantly enhance your WordPress site’s user experience.
We’ll cover everything from the basics of Expires headers and Cache-Control to practical WordPress plugin options, manual configuration, performance testing, and even security considerations.
This guide delves into the world of Expires headers, explaining their role in web caching, and showing how they can be leveraged to optimize your WordPress site. We’ll walk you through different methods, from using plugins to modifying your .htaccess file, ensuring you can confidently improve your site’s speed and overall performance.
Introduction to Expires Headers
HTTP Expires headers are crucial components of web caching. They tell web browsers and caching intermediaries (like proxies) when a specific resource, such as an image or stylesheet, is considered stale and should no longer be served from cache. This mechanism significantly improves website performance by reducing the load on your servers and providing a faster user experience.
By instructing browsers when to retrieve the resource directly from the server, rather than relying on a cached copy, Expires headers enable optimized resource delivery.Properly implemented Expires headers can substantially reduce server load, resulting in a faster website. This, in turn, leads to a better user experience as pages load more quickly. This efficiency translates to lower bandwidth consumption, which is particularly important for users on mobile or limited-bandwidth connections.
Understanding HTTP Expires Headers
Expires headers specify a date and time in the future. When a browser or cache intermediary receives a resource with an Expires header, it stores the resource and the expiration date. Subsequent requests for the same resource within the specified timeframe are served from the cache, rather than the origin server. This significantly speeds up page loading times.
Benefits of Using Expires Headers
The primary benefit of using Expires headers is the reduction in server load. By allowing clients to use cached copies, your web server doesn’t have to process requests for static resources like images, stylesheets, and JavaScript files. This directly impacts website performance. Reduced server load leads to improved responsiveness and fewer errors. Moreover, it contributes to lower bandwidth consumption for users, particularly those on less stable or limited bandwidth connections.
Expires Headers vs. Cache-Control Headers
While both Expires and Cache-Control headers manage caching, they differ significantly in their approach and flexibility. Expires headers rely solely on a single date and time for caching decisions. Cache-Control headers, on the other hand, provide a broader set of directives for controlling caching behavior.
Optimizing your WordPress site for speed is crucial, and adding Expires headers is a great way to do that. It’s a simple process that significantly reduces server load. This often leads to faster page load times for your users, which is a win-win. Speaking of streamlining processes, have you considered userguiding vs apty a comprehensive comparison for streamlining new client onboarding?
userguiding vs apty a comprehensive comparison for streamlining new client onboarding can provide a great framework for similar improvements. Ultimately, understanding how to add Expires headers can be a significant boost to your WordPress site’s performance.
Key Differences
| Feature | Expires Headers | Cache-Control Headers |
|---|---|---|
| Mechanism | Specifies a single expiration date and time. | Defines various caching directives (e.g., max-age, no-cache). |
| Flexibility | Limited flexibility, relying on a single expiration date. | More flexible, allowing for complex caching scenarios. |
| Complexity | Simpler to understand and implement, but less adaptable. | More complex to configure, but offers greater control over caching. |
Importance of Proper Expiration Settings
Setting appropriate expiration times is crucial for effective caching. Setting the expiration date too far in the future might result in unnecessarily large cache sizes, while setting it too close to the present might prevent effective caching and increase server load. Careful consideration is needed to balance these factors for optimal performance. For instance, images or stylesheets that rarely change might have a longer expiration date than dynamically generated content that updates frequently.
A well-considered approach can substantially improve the performance of your website.
WordPress Plugin Options

Optimizing your WordPress website for speed and performance often involves implementing Expires headers. These headers instruct web browsers to cache static content, reducing server load and improving user experience. Fortunately, several WordPress plugins streamline this process, automating the configuration and maintenance of caching.Many plugins offer more comprehensive caching strategies than manually setting Expires headers, often improving overall site performance beyond just static asset management.
This section will explore common caching plugins, their features, and how to use them effectively to implement Expires headers.
Common WordPress Caching Plugins
Several popular plugins facilitate caching in WordPress. Choosing the right one depends on your specific needs and technical expertise. Effective caching plugins can significantly enhance site performance, making your website load faster and smoother.
- WP Super Cache: A widely used and reliable plugin, WP Super Cache provides comprehensive caching options, including browser caching, page caching, and object caching. It allows for fine-grained control over caching rules and provides detailed performance reports to monitor caching effectiveness.
- W3 Total Cache: Another popular choice, W3 Total Cache offers advanced caching features, including various caching levels (object, page, database, browser). It’s known for its flexibility and compatibility with other plugins, though its configuration can be somewhat complex for beginners.
- WP Fastest Cache: Focused on speed, WP Fastest Cache aims to minimize load times by aggressively caching static content. Its streamlined interface is beneficial for users seeking a straightforward caching solution. However, its options may be less extensive than some other plugins.
- LiteSpeed Cache: If you’re using LiteSpeed caching on your server, this plugin can further optimize your website by integrating with your existing caching setup. It’s highly recommended for those leveraging LiteSpeed technology for improved performance.
Plugin Feature Comparison
Understanding the nuances of different plugins’ capabilities is key to selecting the right one.
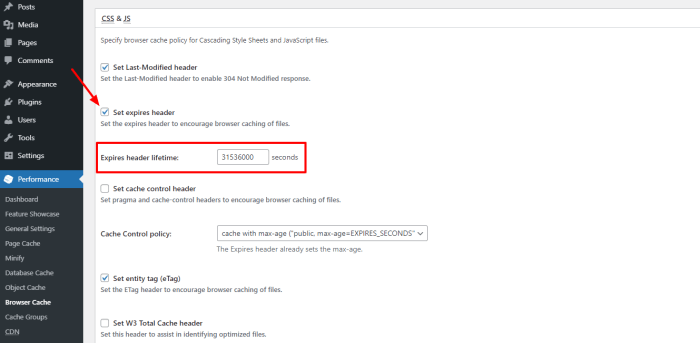
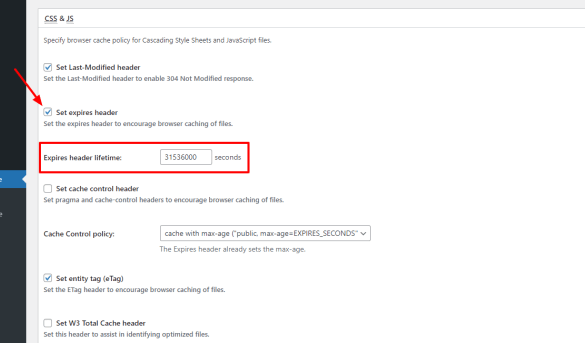
Configuring a Plugin for Expires Headers
Most caching plugins automatically handle Expires headers, so direct configuration isn’t always needed. However, adjusting caching settings within the plugin can influence how long content is cached by browsers. Each plugin has its own interface for configuring caching settings, so detailed steps will vary. Consult the plugin documentation for specific instructions. Generally, you’ll find options to set expiration times for various content types (images, JavaScript files, CSS files, etc.).
Proper configuration ensures that browsers effectively leverage the Expires headers, leading to faster loading times and improved user experience.
Manual Configuration
Manually configuring Expires headers in WordPress involves directly modifying your server’s configuration files, specifically the `.htaccess` file. This approach provides granular control over caching, allowing you to fine-tune expiration times for various file types. However, it requires a deeper understanding of server administration and can be more complex than using a plugin. Incorrect configurations can lead to website issues, so careful consideration is crucial.Understanding the mechanics behind this approach is essential.
By directly manipulating the server’s configuration, you gain precise control over caching behavior. This allows you to tailor expiration times to specific content types, optimizing performance for diverse file types. However, misconfigurations can result in broken caching or other unexpected issues.
Modifying the .htaccess File
The `.htaccess` file is a configuration file used by Apache web servers. It allows you to control various aspects of how your WordPress website functions, including caching. Modifying this file to add Expires headers requires inserting specific directives into the file.
- Open your `.htaccess` file in a text editor. You’ll typically find this file in your WordPress installation’s root directory.
- Add the necessary Expires header directives. These directives define the expiration date and time for different file types. Crucially, ensure these directives are placed correctly within the `.htaccess` file. Incorrect placement can lead to unpredictable results.
- Save the modified `.htaccess` file. This action is critical. If the file is not saved, the changes will not take effect.
Example .htaccess Configuration
This example demonstrates how to configure Expires headers for static resources like images, CSS, and JavaScript. This configuration sets an expiration period of one year for these files.
RewriteEngine On
ExpiresActive OnExpiresDefault “access plus 1 year”
This example uses the `ExpiresActive` directive to enable the `Expires` header. The `ExpiresDefault` directive sets a default expiration time for all matched files. Crucially, `access plus 1 year` represents a specific time duration rather than a date.
Modifying Server Configuration Files
While `.htaccess` is often sufficient for basic caching, server-level configuration files offer more advanced options. Modifying these files allows for greater control over caching behavior.
- Identify your server’s configuration file. This file varies depending on the web server (Apache, Nginx). Consult your hosting provider’s documentation for specific instructions.
- Locate the relevant sections within the configuration file for handling HTTP headers and caching.
- Add or modify directives to control caching, including Expires headers and Cache-Control directives.
- Save the modified configuration file and restart the web server. This is essential for the changes to take effect.
Header Directives for Setting Expiry Times
This table Artikels the key header directives used to set expiration times. Proper use of these directives is critical for effective caching.
Optimizing your WordPress site’s performance often involves adding caching mechanisms, like setting Expires headers. This can significantly boost page load speeds, which is crucial, especially when integrating interactive elements like maps. For example, if you’re using Google Maps and APIs, understanding the cost implications of frequent requests is vital, as detailed in the google mapping and api charging article.
Ultimately, properly configuring Expires headers will save bandwidth and improve user experience for your WordPress site.
Potential Issues and Solutions
Carefully reviewing your `.htaccess` and server configuration files is crucial to avoid issues. Incorrect configurations can lead to problems such as incorrect caching or broken functionality.
- Incorrect syntax: Double-check the syntax of your directives to avoid errors. Consult documentation for the correct format of each directive.
- File permissions: Ensure the server has appropriate permissions to modify the `.htaccess` file. Incorrect permissions can prevent the changes from being applied.
- Caching issues: If you experience caching problems, clear your browser’s cache or use a different browser to test the changes. Also, consider if the problem is related to specific files or your entire website.
Performance Testing and Optimization: How To Add Expires Headers To Your WordPress Website

Adding Expires headers is a crucial step toward boosting WordPress website performance, but its true impact needs careful testing and optimization. This section delves into methods for measuring the effectiveness of Expires headers on loading times, explores various performance testing tools, and provides strategies for optimizing caching and page load speed.Understanding how Expires headers influence website speed is essential for making informed decisions about their implementation and configuration.
Properly configured headers can significantly reduce the number of requests made to the server, leading to faster loading times and a better user experience.
Measuring the Impact of Expires Headers, How to add expires headers to your wordpress website
Implementing Expires headers aims to reduce server load and improve website performance. A key aspect of evaluating their effectiveness is meticulously measuring website loading times before and after their implementation. This involves a robust testing methodology to accurately assess the difference.Tools like Google PageSpeed Insights, GTmetrix, and WebPageTest are valuable resources for measuring website loading times. These tools provide comprehensive reports, highlighting areas for improvement, and offering actionable recommendations.
Regular monitoring with these tools will offer a clearer understanding of the positive effects of Expires headers on your site’s performance.
Optimizing your WordPress site for speed is crucial, and adding Expires headers is a fantastic way to do it. This involves telling browsers how long to cache your files, significantly reducing server load. A skilled digital marketing brand consultant, like the experts at VIP SEO Toolz , can help you understand how these headers impact your overall website performance and strategy.
By implementing the right Expires headers, you’ll see a noticeable improvement in page load times, leading to a better user experience and a boost in search engine rankings.
Performance Testing Tools
Various tools provide in-depth analysis of website performance. Google PageSpeed Insights is a free online tool that evaluates website performance based on Google’s best practices. It provides valuable insights into potential bottlenecks and areas for improvement. GTmetrix is another popular tool that offers a comprehensive analysis of website performance, including metrics such as page load time, server response time, and resource loading.
WebPageTest allows for detailed testing under various conditions, such as different network speeds and locations, providing a more holistic view of performance. Using multiple tools offers a more comprehensive perspective on performance and identifies areas for optimization.
Optimizing Website Performance with Caching
Caching plays a pivotal role in optimizing website performance. Caching mechanisms store frequently accessed website content, reducing the need to retrieve data from the server on each visit. This significantly speeds up loading times, leading to a smoother user experience. Implementing a caching plugin for WordPress, like WP Super Cache or W3 Total Cache, can dramatically improve website performance.
By utilizing caching strategically, websites can ensure a faster and more responsive experience for users.
Strategies for Enhancing Page Load Speed
Several strategies can be used to optimize page load speed, including using a Content Delivery Network (CDN). CDNs distribute website content across multiple servers globally, bringing content closer to users, thus reducing latency and improving loading times. Using image optimization techniques, such as compressing images without sacrificing quality, is also essential. These strategies collectively contribute to faster page load speeds, resulting in a better user experience.
Analyzing Website Performance After Implementation
After implementing Expires headers and other performance optimization strategies, careful analysis is crucial. Tracking key performance indicators (KPIs), such as page load time, server response time, and resource loading times, is essential. Regular monitoring of these metrics allows for the identification of any performance issues and enables informed adjustments to strategies. Analyzing these metrics offers insights into the efficacy of implemented changes.
Diagnosing and Resolving Performance Issues
A structured approach to diagnosing and resolving performance issues is critical. Identify potential bottlenecks by monitoring server logs and examining website traffic patterns. Identify specific areas causing performance degradation, such as slow database queries or inefficient code. Resolve these issues to ensure optimal website performance. Careful examination of the server logs and network traffic patterns will often pinpoint the source of performance issues.
Security Considerations
Properly configured Expires headers enhance website performance, but improper configurations can introduce security vulnerabilities. Understanding these risks and implementing mitigation strategies is crucial for a secure WordPress site. Failing to address these issues can expose your site to attacks and compromise user data.Implementing Expires headers involves careful consideration of security implications. By understanding the potential threats and adopting robust security practices, you can safeguard your site and user data.
This section delves into the security implications of Expires headers, offering practical solutions to prevent potential vulnerabilities.
Security Implications of Improperly Configured Expires Headers
Incorrectly set Expires headers can leave your website vulnerable to various attacks. A common risk is allowing attackers to access outdated or compromised resources. If an attacker can exploit vulnerabilities in outdated resources, they could potentially gain unauthorized access to sensitive data or functionality on your website. Furthermore, improperly configured Expires headers might make your site susceptible to denial-of-service attacks, as attackers could try to overload your server by repeatedly requesting outdated resources.
Avoiding Potential Security Vulnerabilities
Implementing Expires headers requires careful planning to avoid security risks. A crucial step is to ensure that cached resources are not vulnerable to attacks. This involves using strong hashing algorithms to verify the integrity of the cached files. Regularly updating the Expires headers is another important measure to prevent attackers from accessing outdated files. A robust access control mechanism is critical.
This involves implementing proper authorization for accessing specific resources. This ensures that only authorized users can access the necessary resources. Avoid storing sensitive data directly in the cached resources. Never include passwords, API keys, or other sensitive information within cached files.
Potential Risks and Threats Related to Expired Resources
Expired resources can pose significant risks. Malicious actors might exploit outdated versions of scripts or plugins to execute arbitrary code on your website. This could lead to data breaches, the theft of user credentials, or the compromise of your server. Outdated resources can also expose your site to known vulnerabilities, making it easier for attackers to exploit these weaknesses.
A common risk is the exposure of sensitive data in expired resources, such as user credentials or configuration files.
Protecting Against Malicious Requests or Data Breaches
Implementing robust security measures is essential to protect your website from malicious requests and data breaches. This involves employing secure coding practices to prevent injection vulnerabilities, cross-site scripting (XSS), and other common web application vulnerabilities. Using HTTPS to encrypt all communication between your website and users is critical to protect sensitive data from eavesdropping. Regularly patching and updating your WordPress installation, plugins, and themes is vital to address known vulnerabilities.
Strong passwords and multi-factor authentication for all accounts are essential to prevent unauthorized access.
Security Best Practices for Configuring Expires Headers
Implementing secure Expires headers involves several best practices. These include using appropriate caching mechanisms to limit the potential for access to outdated resources. Regularly auditing and reviewing your Expires headers configuration is essential to ensure that they align with your security needs. Employing strong hashing algorithms to verify the integrity of cached resources can prevent tampering.
Table of Security Considerations and Solutions
| Risk | Description | Mitigation |
|---|---|---|
| Malicious Requests | Attackers target specific resources | Implement robust access controls, using secure authentication mechanisms. Restrict access to specific resources based on user roles and permissions. |
| Data Breaches | Sensitive data exposed | Use HTTPS to encrypt data transmission. Implement strong password policies and multi-factor authentication. Regularly back up data to prevent loss in case of attacks. |
Final Conclusion
In conclusion, implementing Expires headers in WordPress is a powerful strategy for enhancing website performance. Whether you choose a plugin or manual configuration, understanding the principles of caching and carefully considering your implementation strategy will yield substantial improvements. Remember to always prioritize security and test thoroughly to avoid any unexpected issues. By following the steps Artikeld in this guide, you’ll equip your WordPress site with the tools to deliver lightning-fast page loads and a better user experience.